
Row-level security (RLS) and Object-level security (OLS) allows you to create a single or a set of reports that targets data for a specific user. In this module, you'll learn how to implement RLS by using either a static or dynamic method and how Microsoft Power BI simplifies testing RLS in Power BI Desktop and Power BI service. In addition, you'll learn how to implement OLS to restrict access to Power BI model objects.
Learning objectives
In this module, you will:
- Configure row-level security by using a static method.
- Configure row-level security by using a dynamic method.
- Use single sign-on (SSO) for DirectQuery sources
- Restrict access to Power BI model objects with object-level security.
Prerequisites
None
This module is part of these learning paths
- Manage and secure Power BI
- Introduction1 min
- Configure row-level security with the static method4 min
- Configure row-level security with the dynamic method2 min
- Use single sign-on (SSO) for DirectQuery sources1 min
- Restrict access to Power BI model objects8 min
- Exercise - Enforce row-level security in Power BI20 min
- Check your knowledge2 min
- Summary
Introduction
Imagine you work for Tailspin Traders, a company that maintains a database of sales, products, and employee information. You want to create a single report where employees in a specific department can only view the sales data relevant to their department.
Instead of creating and managing separate reports for each department, you can use Row Level Security (RLS) in Power BI. RLS allows you to control access to data at the row level, ensuring that users only see data pertinent to their role. This approach not only simplifies report management but also enhances data security and compliance.
There are several ways to implement RLS in Power BI. The Static method is suitable for a small number of roles that rarely change. The Dynamic method is better for a large number of roles that change frequently. Alternatively, you can use single sign-on (SSO) for some data sources that use Direct Query, enforcing data permissions at the data source level.
Additionally, you can use Object-level security (OLS) to restrict access to specific tables and columns like employee salaries or personal information. This method is useful when you need to restrict access to sensitive data at the object level.
Configure row-level security with the static method
As a data modeler, you set up RLS by creating one or more roles. A role has a unique name in the model, and it usually includes one or more rules. Rules enforce filters on model tables by using Data Analysis Expressions (DAX) filter expressions.
The static method in row-level security (RLS) uses a fixed value in the DAX filter, while the dynamic method uses a DAX function.
Note
By default, a data model has no roles. A data model without roles means that users (who have permission to query the data model) have access to all model data.
It's possible to define a role that includes no rules. In this case, the role provides access to all rows of all model tables. This role set up would be suitable for an admin user who is allowed to view all data.
RLS involves several configuration steps. Begin by creating a report in Microsoft Power BI Desktop, which includes importing data, applying star schema design principles, and creating report visuals. Then, set up RLS roles using DAX and test them within Power BI Desktop. Once the roles are configured, deploy the report to Microsoft Power BI service, add members to the roles, and conduct final testing in the Power BI service.
Create a report in Power BI Desktop
Follow the typical steps to create a report in Power BI Desktop. Use Microsoft Power Query to retrieve and clean the data. Then, confirm that the relationships exists between the tables by using the Modeling tab.
- We recommend you apply star schema design principles to produce a model comprising dimension and fact tables.
- It’s common to set up Power BI to enforce rules that filter dimension tables, allowing model relationships to efficiently propagate those filters to fact tables.
Your next step is to create a Power BI report.
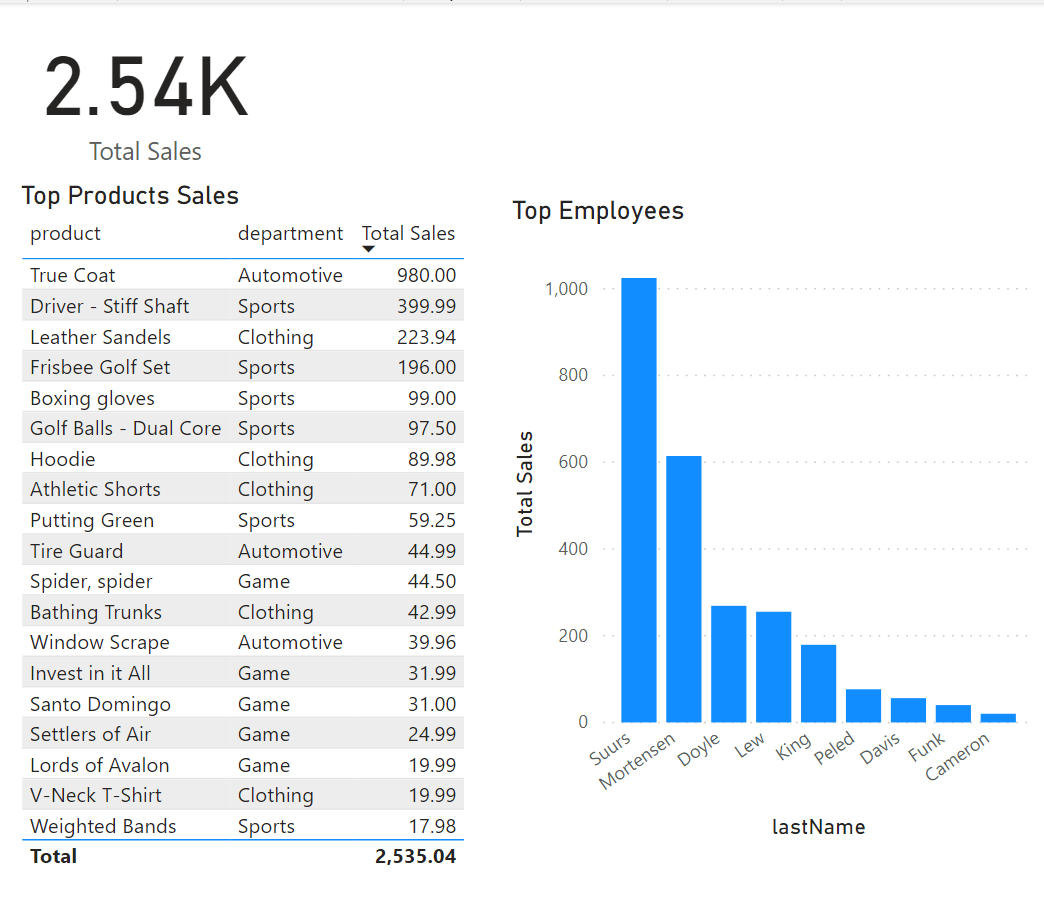
Notice how the preceding table has rows for all sales, including all departments. You will be limiting visibility so that only employees of a specific department can see their own sales.
Create RLS roles in Power BI Desktop
Power BI row-level security (RLS) uses DAX to control who can see which data. Consider it as always adding another filter to the appropriate users, regardless of the filters, slicers, or interactions that the users choose on a Power BI report.
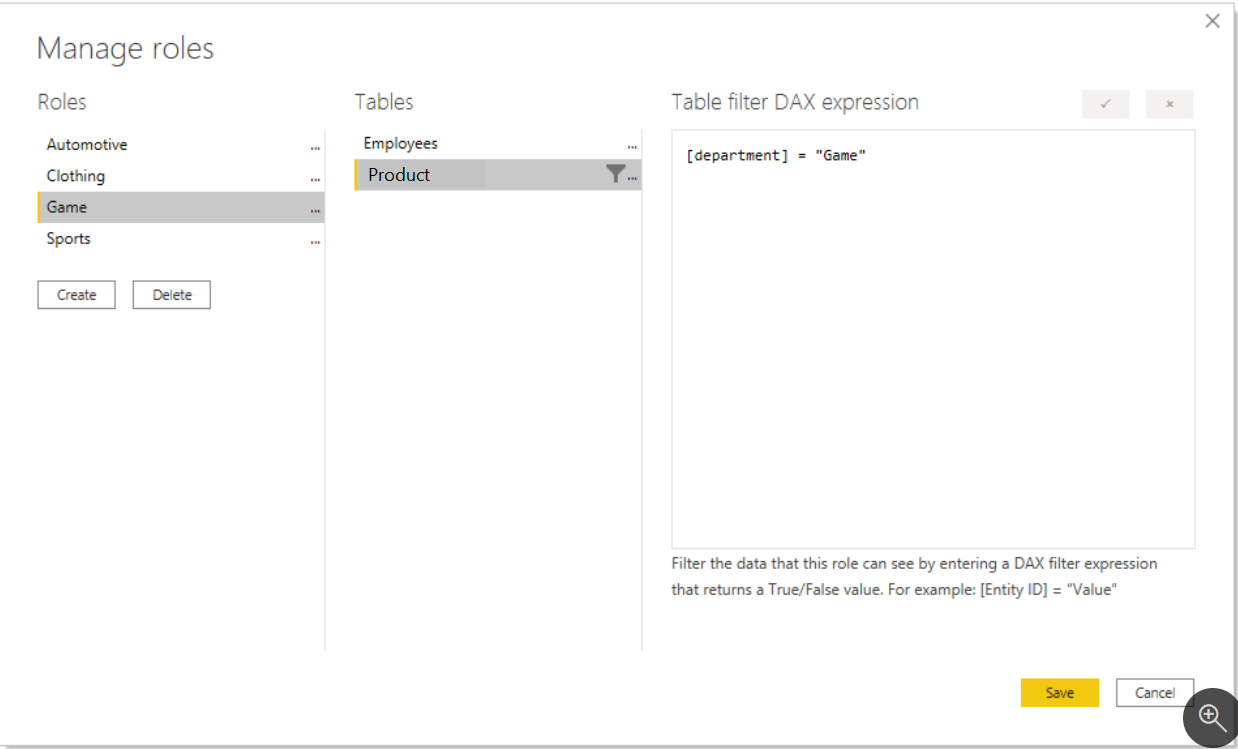
To create RLS roles in Power BI Desktop, select the Modeling tab, and then select Manage Roles. On the Manage security roles page, create a role for each department, and then add a filter or DAX expression to it. For instance, you can create a role called Game and then add the filter or DAX expression [Department] = "Game". Then, whenever a member of that role interacts with the report, Power BI will add that filter to their interactions, thus limiting what they see.
A fixed value is used in the filter on the right side of the equal sign (in this case, "Game"). The intention is that, if you ever need to add a category, you will need to create a new role with a new value in the DAX expression.
The DAX filter is applied to every interaction, slicer, and filter that the user applies. If you have a DAX filter that performs poorly, the user experience will be negatively impacted. Therefore, keep the DAX filter as simple as possible.
Test the roles in Power BI Desktop
You can validate that the filter is working by selecting the Modeling tab and then selecting View as Roles.
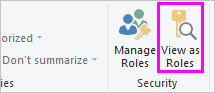
In the View as roles window, select the Game role. The report now renders as if you were in that role, and you will only see the records that are included in the Game department.
You can undo this filter by selecting View as roles again and then selecting None.
Deploy the report to Power BI service
You can deploy the report to Power BI service by selecting the Publish button on the Home tab and then selecting a workspace.
Add members to the role in Power BI service
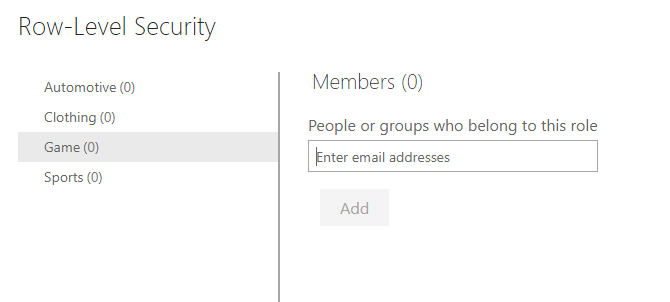
To add members to the role in Power BI service, go to your workspace in Power BI service. Find the semantic model that you created with the same name as your report. Select the ellipsis (...) button and then select Security.
In the Row-Level Security screen, you can add Microsoft Entra ID users and security groups to the security role. When members are added to this role, the DAX filter that you previously defined will be applied to them. If members are not added to the role, but they have access to the report, RLS will not apply to them. You can add the three people in the Game department to the Game role. Now, when those members sign in, they will only see the report with data that applies to them.
Note
RLS only applies to viewers in a workspace. Workspace members assigned Admin, Member, or Contributor roles have edit permissions for the semantic model, and therefore, RLS does not apply to them
Tip
When possible, it’s a good practice to map roles to security groups. That way, there will be fewer mappings, and you can delegate the group membership management to the network administrators.
Test the roles in Power BI service
Testing roles in Power BI service allows you to simulate and verify that the row-level security (RLS) configurations are working as intended. Select the ellipsis (...) next to the Game role on the Row-Level Security screen and then selecting Test as role.
This selection will display the report as if you were a member of the role in Power BI service.

Now that you understand how to configure RLS with the static method, let’s explore how to do it dynamically.
Configure row-level security with the dynamic method
Defining static rules is simple and effective. However, be aware of disadvantages: setting up static rules can involve significant effort to create and set up. It would also require you to update and republish the dataset when new regions or departments are onboarded.
If there are many rules to set up and you anticipate adding new rules in the future, consider creating dynamic rules instead, without the need to continue maintaining it dynamically.
Defining dynamic rules is simple and effective when a model table stores username or email address values. They allow you to enforce a data-driven RLS design. For example, when salespeople are added to, or removed from, the Employees table (or are assigned to different regions), this design approach just works.
As the admin at Tailwind Traders, you want Power BI row-level security to only show sales to the person who made them. In this example, Russel King has made four sales. When viewing your report, Russel should only see the sales that he's responsible for and no other sales. You can configure row-level security exactly the way you configured it previously, with only a single change. Instead of creating four roles, you only need to create one role. The DAX filter for that role would look similar to the following image.
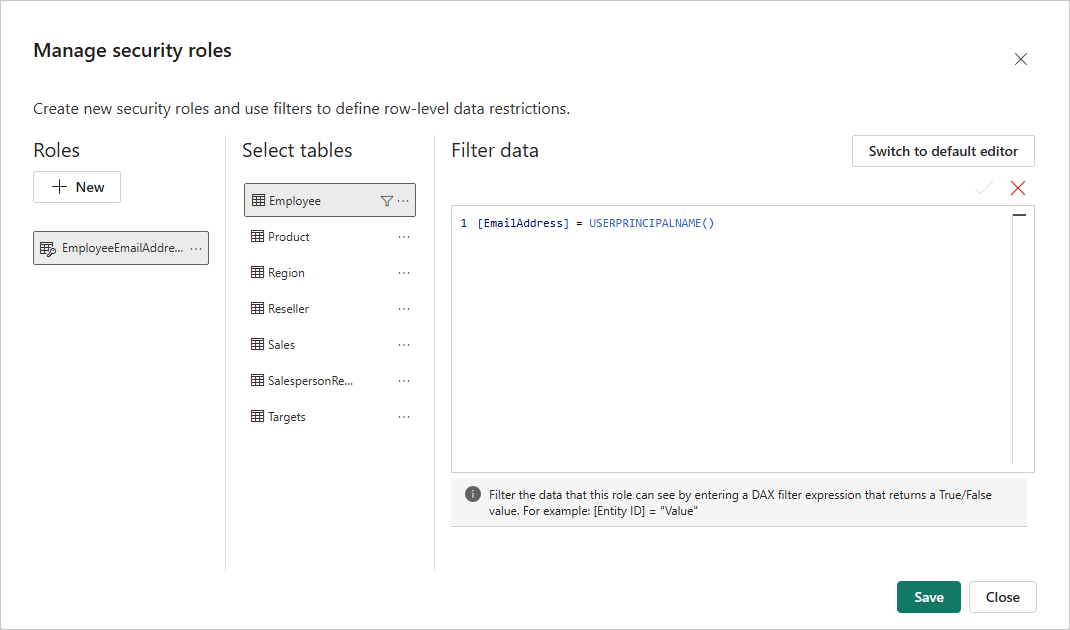
Notice that instead of the fixed string, such as Game or Clothing, this uses a DAX function in the row-level security filter. The userprincipalname() function will compare the email address from the Employees table with the email that the user entered when signing in to Power BI service. If Russel King uses the email address russel@tailwindtraders.com to sign in to Power BI service, the system will compare that value to the email address in the Employees table. Assuming that a relationship has been created between Employees and Sales, Russel will only see his four sales.
There are three specific DAX functions:
- USERNAME or USERPRINCIPALNAME – Returns the Power BI authenticated user as a text value.
- CUSTOMDATA - Returns the CustomData property passed in the connection string. Non-Power BI reporting tools that connect to the dataset by using a connection string can set this property, like Microsoft Excel.
Note
Be aware that the USERNAME function returns the user in the format of DOMAIN\username when used in Power BI Desktop. However, when used in the Power BI service, it returns the format of the user's User Principal Name (UPN), like username@adventureworks.com. Alternatively, you can use the USERPRINCIPALNAME function, which always returns the user in the user principal name format.
Use single sign-on (SSO) for DirectQuery sources
When your data model has DirectQuery tables and their data source supports SSO, the data source can enforce data permissions. This way, the database enforces RLS, and Power BI datasets and reports honor the data source security.
Consider that Tailspin Traders has an Azure SQL Database for their sales operations that resides in the same tenant as Power BI. The database enforces RLS to control access to rows in various database tables. You can create a DirectQuery model that connects to this database without roles and publish it to the Power BI service. When you set the data source credentials in the Power BI service, you enable SSO. When report consumers open Power BI reports, Power BI passes their identity to the data source. The data source then enforces RLS based on the identity of the report consumer.

Note
Calculated tables and calculated columns that reference a DirectQuery table from a data source with SSO authentication aren’t supported in the Power BI service.
Restrict access to Power BI model objects
As a data modeler, you can consider restricting user access to Power BI model objects. Object-level security (OLS) can restrict access to specific tables and columns, and their metadata. Typically, you apply OLS to secure objects that store sensitive data, like employee personal data.
Consider an example at Tailspin Traders. This organization has a data warehouse dimension table named DimEmployee. The table includes columns that store employee name, phone, email address, and salary. While general report consumers can see employee name and contact details, they must not be able to see salary values. Only senior Human Resources staff are permitted to see salary values. So, the data modeler used OLS to grant access to the salary column only to specific Human Resources staff.

Set up OLS
To set up OLS, you start by creating roles. You can create roles in Power BI Desktop in the same way you do when setting up RLS. Next, you need to add OLS rules to the roles. This capability isn’t supported by Power BI Desktop, so you’ll need to take a different approach, for example by using the TMDL view for Power BI Desktop (currently in preview). This feature lets you script, modify, and apply changes using Tabular Model Definition Language (TMDL), providing an alternative experience to semantic modeling using code, instead of a graphical user interface such as Model view.
To turn on this public preview feature, go to File > Options and settings > Options > Preview features and check the box next to TMDL View.
Once the preview feature is enabled, the TMDL view tab will appear on the left side of the Power BI Desktop window:

When first opening TMDL view, the code editor will be empty, you can script any semantic model object such as table, measure, column or role by selecting the objects from the Data pane (you can find the Role in the Model view) and dragging them into the code editor.

By default, all model tables and columns aren’t restricted. You can set them to None or Read. When set to None, users associated with the role can’t access the object. When set to Read, users associated with the role can access the object. When you’re restricting specific columns, ensure the table isn’t set to None.
YAMLCopy
createOrReplace
    role 'All Employees (no HR)'
        tablePermission Employee
            columnPermission Salary = none
When you’re ready, you can select the Apply button to execute the TMDL script against the semantic model and have your TMDL code changes applied in a single step.
Once you’ve added the OLS rules, you can publish the model to the Power BI service. Use the same process for RLS to map accounts and security groups to the roles.
Considerations
In a Power BI report, when a user doesn’t have permission to access a table or column, they'll receive an error message. The message will inform them that the object doesn’t exist.

Consider carefully whether OLS is the right solution for your project. When a user opens a Power BI report that queries a restricted object (for them), the error message could be confusing and will result in a negative experience. To them, it looks like the report is broken. A better approach might be to create a separate set of models or reports for the different report consumer requirements.
Restrictions
There are restrictions to be aware of when implementing OLS.
Row-level security and object-level security cannot be combined from different roles because it could introduce unintended access to secured data. Also, you can’t set table-level security if it breaks a relationship chain. For example, if there are relationships between tables A and B, and B and C, you can't secure table B. If table B is secured, a query on table A can't transit the relationships between table A and B, and B and C. In this case, you could set up a separate relationship between tables A and C.

However, model relationships that reference a secured column will work, providing that the column’s table isn’t secured.
Lastly, while it isn’t possible to secure measures, a measure that references secured objects is automatically restricted.
Exercise - Enforce row-level security in Power BI
This unit includes a lab to complete.
Use the free resources provided in the lab to complete the exercises in this unit. You will not be charged for the lab environment; however, you may need to bring your own subscription depending on the lab.
Microsoft provides this lab experience and related content for educational purposes. All presented information is owned by Microsoft and intended solely for learning about the covered products and services in this Microsoft Learn module.
In this exercise, you learn how to:
- Enforce row-level security
- Choose between dynamic and static methods
This lab takes approximately 20 minutes to complete.
Note
A virtual machine containing the client tools you need is provided, along with the exercise instructions. Use the "Launch lab" button to launch the virtual machine.
A limited number of concurrent sessions are available. If the hosted environment is unavailable, please try again later.
Alternatively, you can open the instructions in a separate window.
Access your environment
Before you start this lab (unless you are continuing from a previous lab), select Launch lab above.
You are automatically logged in to your lab environment as data-ai\student.
You can now begin your work on this lab.
Tip
To dock the lab environment so that it fills the window, select the PC icon at the top and then select Fit Window to Machine.

Check your knowledge
